• Skip to primary navigation
  • Skip to main content
  • Skip to primary sidebar
Menu
  • Science Experiments For Kids
  • Science Fair Projects
  • Science Facts
  • Science Questions
  • About
    • Emma Vanstone
    • About Science Sparks
Science Experiments for Kids
Menu
  • STEM Challenges
    • STEM Challenges
    • FREE STEM Challenge Templates
  • Early Years Science
    • Preschool Science
    • Sensory and Messy Play
    • Understanding of the World
    • Pirate Science Experiments
  • Primary Science
    • Baking Soda Experiments
    • Candy Experiments
    • Biology
    • Climate Change for Kids
    • Coding for Kids
    • Chemistry
    • Electricity for Kids
    • Magic Science Experiments
    • Harry Potter Experiments
    • Human Body Science
    • Air Pressure Experiments
    • Life Cycles
    • LEGO Science Experiments
    • Kitchen Science
    • Famous Scientists
    • Forces and Motion
    • Science Sparks Snippets
    • Key Stage 1 Science
      • Animals
      • Everyday Materials
      • Plants
      • Coding Activities
      • Humans and Health
      • Fine Motor skills
      • Science and Literacy
    • Key Stage 2 Science
      • Animals, Including Humans
      • Electricity
      • Light
      • Plants
      • Materials and their Properties
  • Holiday Science
    • Christmas Science
    • Halloween Science
    • Easter Science
  • Storybook Themed Science Experiments
  • Wonderful Women in STEM
  • FREE Science Resources
menu icon
go to homepage
search icon
Homepage link
  • FREE Experiments
  • Science for Kids
    • Kitchen Science
    • Climate Change
    • Egg Experiments
    • Fairy Tale Science
    • Edible Science
    • Human Health
    • Chemistry
    • Inspirational Women
    • Forces and Motion
  • Science Fair Projects
  • STEM Challenges
  • Science Sparks Books
  • Contact Science Sparks
  • Science Resources for Home and School
    • Email
    • Facebook
    • Instagram
    • Twitter
    • YouTube
  • ×
    Home » Science Experiments for Kids » DIY Torch Light – Simple Circuit

    DIY Torch Light – Simple Circuit

    Modified: May 14, 2021 · Published: Oct 17, 2019 by Emma Vanstone · This post may contain affiliate links · 3 Comments

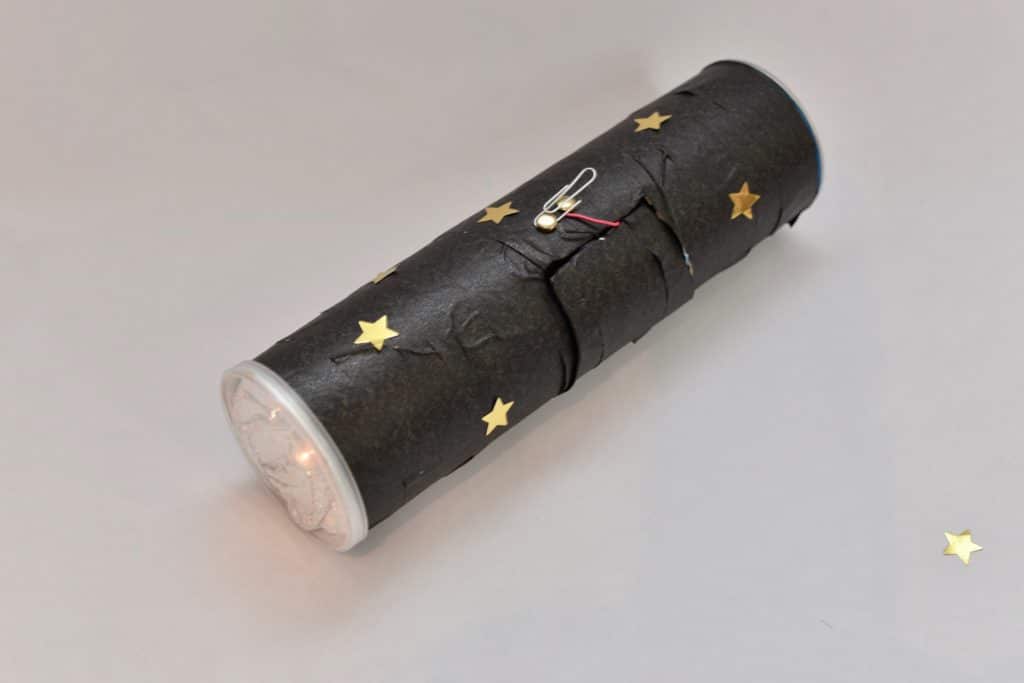
    I can’t take the credit for this one as my 9 year old made it in school last year, but it’s just too good not to have on Science Sparks. I love that it’s more than just a circuit. One of my daughters made a long torch and the other a head torch. Both are made using a simple circuit with a paperclip switch.

    DIY Torch with Switch

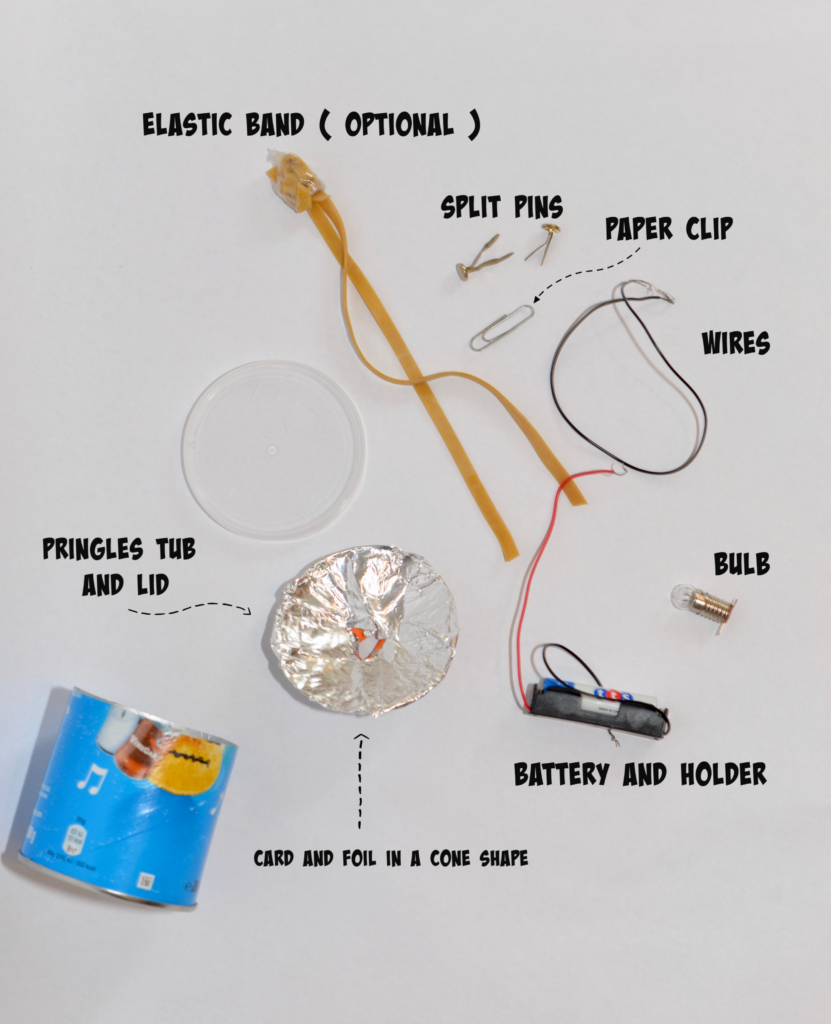
    What you need to make a DIY torch with a switch

    Pringles tube and lid

    Card cut into a cone shape with foil over the top

    Small bulb

    Battery

    Battery holder with wires attached

    1 more wire

    Paperclip

    2 split pins

    Double sided tape

    Materials for a DIY Head torch

    Instructions

    Carefully make two small holes in the side of the Pringles tube. These are for the split pins to go through and will form the switch.

    Make sure you have a wire attached to each end of the battery holder and use double sided tape to attach the battery holder to the inside bottom or side of the Pringles tube.

    Push the the end of one wire from the battery holder through one hole and secure with a split pin.

    DIY Torch - split pin switch

    Take the spare wire and push one end of this through the second hole and secure with the second split pin.

    The two wire ends left need to be attached to the bulb.

    You should have a complete circuit apart from the gap between the split pins.

    Place the paperclip over the split pin ends to check the bulb lights when the circuit is complete.

    If it doesn’t work check for loose wires and try again.

    Carefully make a hole through the centre of the card and foil cone and push the bulb through.

    Cut the cone down to size so it fits tightly inside the top of the tube.

    Place the Pringles lid on top to cover the bulb.

    DIY torch
    Small DIY torch

    Carefully twist one end of the paperclip around the top split pin. You should be able to turn the bulb on and off by twisting the paperclip so it touches the second pin.

    Pringles Can torches

    Decorate as you wish.

    If you use a long Pringles tube make a door in the middle to attach your circuit.

    To make a head torch attach an elastic band around the Pringles tube.

    More Electricity Experiments for Kids

    Learn about series circuits by making a whole street of light up houses!

    Construct a switch with cardboard and a paperclip.

    Try these circuit cards from the Science Kiddo.

    Experiment with play dough circuits.

    Pringles Can Torch

    Last Updated on May 14, 2021 by Emma Vanstone

    « What is Respiration
    What is a scab? »

    Safety Notice

    Science Sparks ( Wild Sparks Enterprises Ltd ) are not liable for the actions of activity of any person who uses the information in this resource or in any of the suggested further resources. Science Sparks assume no liability with regard to injuries or damage to property that may occur as a result of using the information and carrying out the practical activities contained in this resource or in any of the suggested further resources.

    These activities are designed to be carried out by children working with a parent, guardian or other appropriate adult. The adult involved is fully responsible for ensuring that the activities are carried out safely.

    Reader Interactions

    Comments

    1. Lynda Gulwell

      December 02, 2021 at 8:36 am

      Hi!
      Love your ideas and using with a class of 30 8-9 year olds.
      On the DIY simple torch the battery holders ( is it 2 AA batteries that are used?) are way out of our league for purchasing 30 of them.
      Can we make our own battery holders? How?
      OR – if we are using the same type of light bulbs as you are – will one AA battery suffice instead of two?

      Reply
      • Emma Vanstone

        December 02, 2021 at 8:14 pm

        Hello, one AA battery will be fine. If you don’t have battery holders you could use a thick elastic band around the battery to fix the wires in place, but it is easier with a holder.

        Reply
        • Lynda Gulwell

          December 02, 2021 at 10:04 pm

          Thanks for a quick reply, Emma, and the advice. Now I will leave it up to the children to explore and discover – but I have suggestions ready if they get stuck! Brilliant!!!
          PS we had great fun and success following the video instructions on how to make a Harry Potter wand- whizzo!!!

          Reply

    Leave a Reply Cancel reply

    Your email address will not be published. Required fields are marked *

    Primary Sidebar

    • Email
    • Facebook
    • Instagram
    • Twitter
    • YouTube

    What are you looking for?

    Fill your inbox with science

    Newsletter

    Signup for weekly science in your inbox

    You can unsubscribe anytime. For more details, review our Privacy Policy.

    Thank you!

    You have successfully joined our subscriber list.

    Science Sparks Books
    Around the World in 50 Experiments

    Footer

    ↑ back to top

    Science Sparks - FREE science experiments for kids

    Newsletter

    • Sign Up! for emails and updates

    Contact

    • Contact
    • Privacy Policy
    • Services
    • Media Kit
    • FAQ

    As an Amazon Associate, I earn from qualifying purchases.

    Copyright © 2025 Science Sparks - Wild Sparks Enterprises Ltd