• Skip to primary navigation
  • Skip to main content
  • Skip to primary sidebar
Menu
  • Science Experiments For Kids
  • Science Fair Projects
  • Preschool Science
  • Science Facts
  • Printable Experiments
  • Science Sparks Books
  • Science Questions
  • Contact Me
Science Experiments for Kids
Menu
  • STEM Challenges
  • Early Years Science
    • Preschool Science
    • Sensory and Messy Play
    • Understanding of the World
    • Pirate Science Experiments
  • Primary Science
    • Baking Soda Experiments
    • Candy Experiments
    • Biology
    • Climate Change for Kids
    • Coding for Kids
    • Chemistry
    • Electricity for Kids
    • Magic Science Experiments
    • Harry Potter Experiments
    • Human Body Science
    • Air Pressure Experiments
    • Life Cycles
    • LEGO Science Experiments
    • Kitchen Science
    • Famous Scientists
    • Forces and Motion
    • Science Sparks Snippets
    • Key Stage 1 Science
      • Animals
      • Everyday Materials
      • Plants
      • Coding Activities
      • Humans and Health
      • Fine Motor skills
      • Science and Literacy
    • Key Stage 2 Science
      • Animals, Including Humans
      • Electricity
      • Light
      • Plants
      • Materials and their Properties
  • Key Stage 3
  • Holiday Science
    • Christmas Science
    • Halloween Science
    • Easter Science
  • Storybook Themed Science Experiments
  • Wonderful Women in STEM
menu icon
go to homepage
search icon
Homepage link
  • FREE Experiments
  • Science for Kids
    • Kitchen Science
    • Climate Change
    • Egg Experiments
    • Fairy Tale Science
    • Edible Science
    • Human Health
    • Chemistry
    • Inspirational Women
    • Forces and Motion
  • Science Fair Projects
  • STEM Challenges
  • Science Sparks Books
  • Contact Science Sparks
    • Email
    • Facebook
    • Instagram
    • Twitter
    • YouTube
  • ×

    Home » Key Stage 2 Science » Make a Mini Water Cycle Model

    Make a Mini Water Cycle Model

    July 30, 2012 By Emma Vanstone 17 Comments

    The water cycle is an amazing process that we started to talk about when discussing evaporation a couple of weeks ago.

    Today we will have a go at creating our own mini water cycle model.

    water cycle cartoon diagram

    What is the water cycle?

    Water on Earth is recycled over and over again; it’s always moving. It is this recycling process that we call the water cycle.

    1. Evaporation – water evaporates into the air

    The sun heats water on land, rivers, lakes and seas and turns it into water vapour.

    The water vapour rises into the air.

    2. Condensation – water vapour condenses into clouds

    As water vapour in the air cools down, it turns back into tiny drops of water. These tiny drops of water form clouds.

    3. Precipitation – water falls as rain

    As the amount of water vapour in the clouds increases, the clouds get heavier and heavier. Water falls back to the ground as rain, sleet, or snow if it’s cold enough.

    4. Water returns to the sea

    As rainwater runs over the land back to rivers and the sea, some is taken up by and used by plants, and some returns to the air through transpiration. Most rainwater collects in lakes or rivers and flows back to the sea for the water cycle to start again.

    The arrow from the sea to the sun – evaporation

    The arrow from the sun to the clouds – condensation

    The arrow from the Clouds to the mountains – precipitation

    Water Cycle Diagram - water cycle diagram showing evaporation, condensation, collection and precipitation

    Make a water cycle model

    You’ll need

    A plastic bowl (mixing bowl size)

    Cling film

    A mug

    String

    Water

    bowl, jug of water, mug and string for a water cycle activity

    How to make a water cycle model

    It is best to do this outside in a sunny place.

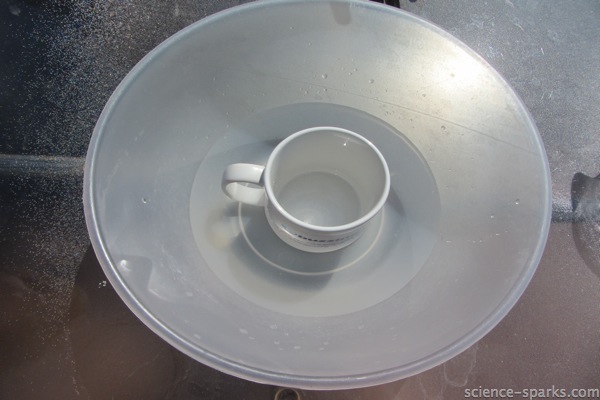
    1. Place the mug in the bottom of the bowl

    2. Add water around the mug so that it comes up to ⅔rd of the mug – if you can draw on the bowl, mark where the water level is.

    Water cycle made with a bowl and cling film

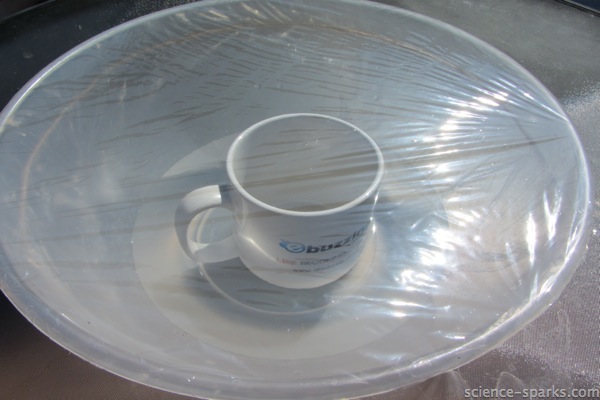
    3. Cover the bowl tightly in clingfilm and fasten it in place with the string.

    Make a Mini Water Cycle, Science-sparks

    4. Watch what happens!

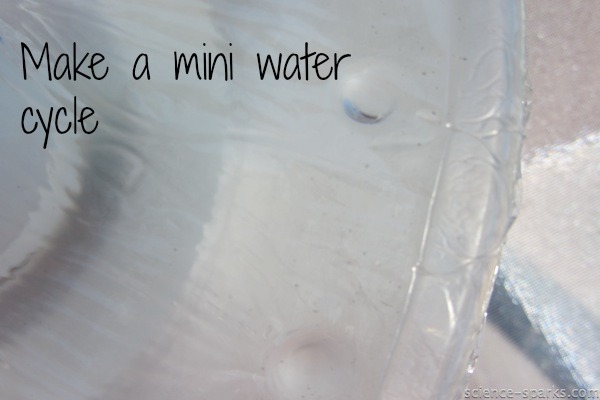
    How does the water cycle model work?

    You should find that you can see condensation drops of water on the top of the cling film and that the water level has lowered, proving that evaporation has taken place. The condensation droplets are the clouds. They will be dripping back into the bowl, but you should find some water in the cup (your mountains), demonstrating precipitation!

    water cycle model made wit a bowl, cling film and a cup

    More Water Cycle Activities

    Can you make a water cycle in a bag? Draw the sun and a cloud on a bag. Add some water and stick it to the inside of a sunny window. Watch as the water evaporates and condenses inside the bag!

    water cycle in a bag

    Water Cycle Worksheet

    Print the water cycle diagram below, cut out the squares and stick them in the correct place!

    water cycle worksheet with labels that can be cut and stuck on a diagram

    We love this LEGO water cycle model from EDventures, and this raining sponge from The Pinterested Parent is cool too.

    Did you know you can measure rainfall with a simple rain gauge?

    Don’t forget to try my other weather science experiments too!

    Image of the water cycle and a demonstration using a sealable bag

    Last Updated on January 26, 2023 by Emma Vanstone

    « Fun with measuring
    Straw Shooter – aerodynamics for kids »

    Safety Notice

    Science Sparks ( Wild Sparks Enterprises Ltd ) are not liable for the actions of activity of any person who uses the information in this resource or in any of the suggested further resources. Science Sparks assume no liability with regard to injuries or damage to property that may occur as a result of using the information and carrying out the practical activities contained in this resource or in any of the suggested further resources.

    These activities are designed to be carried out by children working with a parent, guardian or other appropriate adult. The adult involved is fully responsible for ensuring that the activities are carried out safely.

    Reader Interactions

    Comments

    1. maryanne @ mama smiles

      August 01, 2012 at 8:40 am

      What a great activity! Love your diagram, too.

      Thanks for sharing with Learning Laboratory at Mama Smiles =)

      Reply
      • ScienceSparks

        August 09, 2012 at 11:29 am

        Thank you. xx

        Reply
    2. Coombemill - Fiona

      August 02, 2012 at 12:06 am

      Such a great way to introduce education into play. All my kids love science experiments.

      Reply
      • ScienceSparks

        August 09, 2012 at 11:29 am

        Its lovely to see them enjoy science isn’t it?

        Reply
    3. maggy, red ted art

      August 02, 2012 at 5:21 pm

      Ooh fabulous project – as always!

      Thank you for sharing on Kids Get Crafty!

      Maggy

      Reply
      • ScienceSparks

        August 09, 2012 at 11:29 am

        Thanks Maggy 🙂

        Reply
    4. Beth

      August 06, 2012 at 11:56 am

      LOVE Science experiments to get kids interested in Science! We have this on our list to try too. Thanks for sharing it at TGIF! Have a great week
      Beth =-)

      Reply
      • ScienceSparks

        August 09, 2012 at 11:30 am

        So glad you liked it Beth!

        Reply
    5. Carrie

      August 10, 2012 at 3:05 am

      What a great activity!! We will have to give this one a try. Thank you for sharing at Sharing Saturday!!

      Reply
    6. Allison

      August 11, 2012 at 5:27 am

      I’m pinning this to do with my boys in the near future, and I’m featuring on The Sunday Showcase tomorrow. Thank you for sharing!

      Reply
    7. Ashley

      August 11, 2012 at 12:51 pm

      Great idea! I’ll have to try it with my girls!

      Reply
    8. jennifer

      February 27, 2013 at 5:50 pm

      i loved it❤❤❤❤❤❤❤

      Reply
    9. Marchele

      March 18, 2015 at 5:54 pm

      This was So cool!!!!!!!!!!! I love science!

      Reply
    10. Marcia Reme

      March 18, 2017 at 8:42 pm

      this is an excellent hands on activity to explain the process of the water cycle. students get to see each process and lean from observations. It is very engaging.

      Reply
    11. Tamika Gaskill

      June 17, 2017 at 1:07 am

      How long should the bowl be left outside before students check it?

      Reply
    12. Abbey Fencl

      February 28, 2018 at 6:01 pm

      This is awful so awful lets go science yay yippie kai yaaa

      PS your unloved

      Reply
    13. Arsalan Ahmad

      May 15, 2018 at 5:51 am

      Such a scenic view ,looks great. Lovely.

      Reply

    Leave a Reply Cancel reply

    Your email address will not be published. Required fields are marked *

    Primary Sidebar

    • Email
    • Facebook
    • Instagram
    • Twitter
    • YouTube

    What are you looking for?

    JOIN US!

    Get new experiments straight into your inbox every week!!

    Thank you!

    You have successfully joined our subscriber list.

    .

    Footer

    ↑ back to top

    Science Sparks - FREE science experiments for kids

    Newsletter

    • Sign Up! for emails and updates

    Contact

    • Contact
    • Privacy Policy
    • Services
    • Media Kit
    • FAQ

    As an Amazon Associate I earn from qualifying purchases.

    Copyright © 2022 Science Sparks - Wild Sparks Enterprises Ltd